terça-feira, 10 de outubro de 2023

[ORACLE] ORA-16597: Oracle Data Guard Broker detects two or more primary databases. #JoelKallmanDay

Hello everyone

I hope you're doing weel.

Last week, I was doing a test using Data Guard Broker and at the end of the switchover I got the error bellow:
    
       switchover was not sucessful - Timeout

These problems in my alert.log were the main cause of the error, propably:   

LAD:2 network reconnect abandoned
<error barrier> at 0x7ffcb2af9bf0 placed krsl.c@6774
ORA-03135: connection lost contact
*** 2023-10-04 09:57:23.145275 [krsh.c:6348]

When I checked my databases - Primary and DG, the switchover was completed with success.

        select 
            inst_id, database_role, open_mode, log_mode, flashback_on, force_logging        
       from 
            gv$database;


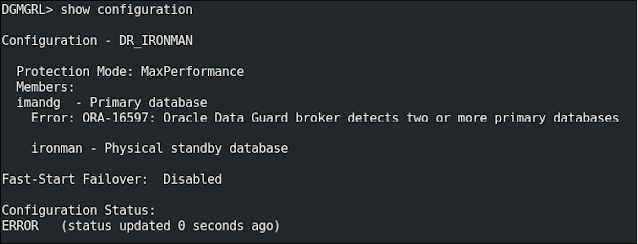
Everything was Ok, but when I checked my DG Broker, the error bellow occurred.

        show configuration


Okay, I admit that I thought: 
I'm a smart guy, a smart DBA, an Oracle ACE, so I'm just remove the configuration and that's it! 😄

Well done!!! Emotional damage!!! I failed, miserably!!! 😅😅😅 

         remove configuration;


The solution to this was, but always remember:
  • This step-by-step worked for me, but it may not work for you.
  • It's a basic and limited environment. The real life will be different, for sure.
  • This post is for study and testing as well, and has no concern for performance and security best practices.

1)  Check the location of the DG Broker config files

show parameter dg_broker_config_file 


2) Change the dg_broker_start parameter in both environments
     
       alter system set dg_broker_start=false scope=both sid='*';

3) Remove DG Broker config files 

rm -f /u01/app/oracle/product/19.3.0.0/db_1/dbs/dr1IMANDG.dat
rm -f /u01/app/oracle/product/19.3.0.0/db_1/dbs/dr2IMANDG.dat

4) Check if the configuration was removed
       
        show configuration


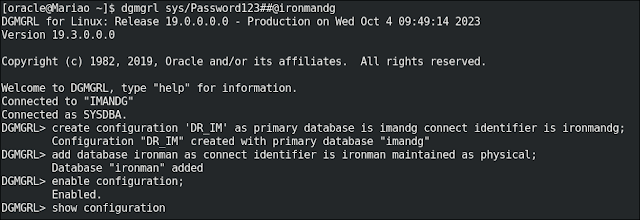
5) At the end, I'll recreate the DG Broker configs
        create configuration 'DR_IM' as primary database is imandg connect identifier is ironmandg;
 
        add database ironman as connect identifier is ironman maintained as physical;

        enable configuration;


        show configuration verbose;

            Configuration - DR_IM
            Protection Mode: MaxPerformance
              Members:
              imandg  - Primary database
              ironman - Physical standby database 
              Properties:
                FastStartFailoverThreshold      = '30'
                OperationTimeout                = '30'
                TraceLevel                      = 'USER'
                FastStartFailoverLagLimit       = '30'
                CommunicationTimeout            = '180'
                ObserverReconnect               = '0'
                FastStartFailoverAutoReinstate  = 'TRUE'
                FastStartFailoverPmyShutdown    = 'TRUE'
                BystandersFollowRoleChange      = 'ALL'
                ObserverOverride                = 'FALSE'
                ExternalDestination1            = ''
                ExternalDestination2            = ''
                PrimaryLostWriteAction          = 'CONTINUE'
                ConfigurationWideServiceName    = 'ironman_CFG'
      
      Fast-Start Failover:  Disabled
      
      Configuration Status:
          SUCCESS

Yes, it's simple and work's very well!

I'm hope this post helps you.

Regards
Mario

terça-feira, 3 de outubro de 2023

[ORACLE] How do I upgrade the AHF.

Hello everyone!!!

I hope you're doing well!

In my last post here, I've showed how to install the Oracle Autonomous Health Framework (AHF).  

Today, I'll show how you can upgrade the AHF and how to use the auto upgrade as well.  

But always remember:

  1. This step-by-step worked for me, but it may not work for you.
  2. It's a basic and limited environment. The real life will be different, for sure.
  3. This post is for study and testing as well, and has no concern for performance and security best practices.
So, let's get started!!! 

1) Download the AHF zip file

I'll download the last version, "AHF 23.8.0 for Linux". 


Important: I'll execute all opertations with user ROOT.

2) Check the zip file

There is no need to unzip the file.


3) Check the AHF services 

tfactl print status


4) Set to stage for upgrade (if you don't run auto upgrade process)

ahfctl setupgrade -swstage /u01/AHF


Important: If you don't run the setup upgrade, you'll receive the error below:


5) Finally, I'll run the upgrade

ahfctl upgrade


6) And now, I'll check the services

tfactl print status


The upgrade process also removes the zip file from the staging area.


You can make the process easier if you configure the auto upgrade process.

If you run this setup before upgrade, you don't need to run the stage setup (step 4):

ahfctl setupgrade -all

Enter autoupgrade flag <on/off> : on
Enter software stage location : /u01/AHF
Enter auto upgrade frequency : 30
AHF autoupgrade parameters successfully updated
Successfully synced AHF configuration
refreshConfig() completed successfully.


More information about auto upgrade here.

And that's it my friends. AHF has been updated and is ready to use!!!

So, I hope this has helped.

Regards
Mario

sexta-feira, 29 de setembro de 2023

[ORACLE] How do I install the Oracle Autonomous Health Framework (AHF)?

Hello everyone!!!

I hope you're doing well!

Today, I'll show you how to install the Oracle Autonomous Health Framework (AHF). 

I don't have an Oracle RAC installed here on my laptop, but I'll provide it. Today I'll show you a single-node environment.

I decided to write and learn a bit more about AHF after having the privilege of attending Sandesh Rao's live session at Oracle Cloudworld 2023 in Las Vegas.

First, what is Oracle Autonomous Health Framework?

In Oracle's words, it's a "Machine learning-based solution for maintaining database availability and performance".

In Mario's words, it's a "very cool tool that collects and groups your system health information and logs and uses Machine Learning to provide you insights and predictions so that you can act preventively, avoiding problems in your environment".


For more information, feel free to click.

So, let's get started!!!

But always remember:

  1. This step-by-step worked for me, but it may not work for you.
  2. It's a basic and limited environment. The real life will be different, for sure.
  3. This post is for study and testing as well, and has no concern for performance and security best practices.
1) Download the AHF zip file

In my post, I'll download version "AHF 23.7.0 for Linux". 

Calm down, calm down, buddy!!! I know we already have version 23.8 at the time of writing this post (Sep/23), but I'll show you how to upgrade the version on next post. 


2) Unzip the zip file

Important: I'll execute all installation with user ROOT.

[root@Mariao ~]# cd /u01/AHF
[root@Mariao ~]# unzip AHF-LINUX-v23.7.0.zip


3) Create the data directory.

[root@Mariao ~]# mkdir -p /AHF/Data


3) Run install.

In red, my changes and interactions.

[root@Mariao ~]# cd /u01/AHF/

[root@Mariao AHF]# ./ahf_setup 

AHF Installer for Platform Linux Architecture x86_64

AHF Installation Log : /tmp/ahf_install_237000_306422_2023_09_29-09_29_16.log

Starting Autonomous Health Framework (AHF) Installation

AHF Version: 23.7.0 Build Date: 202307281326

Default AHF Location : /opt/oracle.ahf

Do you want to install AHF at [/opt/oracle.ahf] ? [Y]|N : N

Please Enter new AHF Location : /AHF/Data

AHF Location : /AHF/Data/oracle.ahf

AHF Data Directory stores diagnostic collections and metadata.
AHF Data Directory requires at least 5GB (Recommended 10GB) of free space.

Choose Data Directory from below options : 

1. /AHF/Data/oracle.ahf [Free Space : 12525 MB]
2. Enter a different Location

Choose Option [1 - 2] : 1

AHF Data Directory : /AHF/Data/oracle.ahf/data

Do you want to add AHF Notification Email IDs ? [Y]|N : N

Extracting AHF to /AHF/Data/oracle.ahf

Configuring TFA Services

Discovering Nodes and Oracle Resources

Not generating certificates as GI discovered

Starting TFA Services
Created symlink /etc/systemd/system/multi-user.target.wants/oracle-tfa.service -> /etc/systemd/system/oracle-tfa.service.
Created symlink /etc/systemd/system/graphical.target.wants/oracle-tfa.service -> /etc/systemd/system/oracle-tfa.service.

.----------------------------------------------------------------------------.
| Host   | Status of TFA | PID    | Port | Version    | Build ID             |
+--------+---------------+--------+------+------------+----------------------+
| mariao | RUNNING       | 308232 | 5000 | 23.7.0.0.0 | 23700020230728132609 |
'--------+---------------+--------+------+------------+----------------------'

Running TFA Inventory...

Adding default users to TFA Access list...

.---------------------------------------------------------.
|               Summary of AHF Configuration              |
+-----------------+---------------------------------------+
| Parameter       | Value                                 |
+-----------------+---------------------------------------+
| AHF Location    | /AHF/Data/oracle.ahf                  |
| TFA Location    | /AHF/Data/oracle.ahf/tfa              |
| Orachk Location | /AHF/Data/oracle.ahf/orachk           |
| Data Directory  | /AHF/Data/oracle.ahf/data             |
| Repository      | /AHF/Data/oracle.ahf/data/repository  |
| Diag Directory  | /AHF/Data/oracle.ahf/data/mariao/diag |
'-----------------+---------------------------------------'

Starting ORAchk Scheduler from AHF

Setting up AHF CLI and SDK

AHF binaries are available in /AHF/Data/oracle.ahf/bin

AHF is successfully Installed

Do you want AHF to store your My Oracle Support Credentials for Automatic Upload ? Y|[N] : N

Moving /tmp/ahf_install_237000_306422_2023_09_29-09_29_16.log to /AHF/Data/oracle.ahf/data/mariao/diag/ahf/


4) And finally, check the installation.

[root@Mariao ~]# tfactl print status


[root@Mariao ~]#  tfactl toolstatus


[root@Mariao ~]# ahfctl statusahf


It's realy easy!

In the next post, I'll show you how to upgrade the AHF version.

So, I hope this has helped.

Regards
Mario

quarta-feira, 27 de setembro de 2023

[ORACLE] Enabling AWR Snapshots and running AWR reports from Oracle Multitentant Architecture - CDBs and PDBs

Hello everyone!!!

How are you doing?

Before the multitenant architecture, we ran the AWR snapshoits and reports in the database and that was it. All the database information was in the AWR report and done.

Today, when DBAs use the multitenant architecture, 99% of them run the AWR snapshots and reports in the CDB level and thats Ok. 

But sometimes we need a bit more accurate information, and for that we can run the AWR snapshots and reports at the PDB level. 

To do this, I'm going to setup the CDB with the steps below:

But always remember:

  1. This step-by-step worked for me, but it may not work for you.
  2. It's a basic and limited environment. The real life will be different, for sure.
  3. This post is for study and testing as well, and has no concern for performance and security best practices.
So let's go to the party!
 
1) List pdbs

SQL> @showpdb

2) Enable awr_pdb_autoflush on cdb.

SQL> SHOW PARAMETER awr_pdb_autoflush_enabled;
SQL> ALTER SYSTEM SET awr_pdb_autoflush_enabled=TRUE SCOPE=both SID='*';
SQL> ALTER SYSTEM SET awr_snapshot_time_offset=1000000 SCOPE=both SID='*';


Important: 
As the Oracle Manual show us:
"When you change the value of AWR_PDB_AUTOFLUSH_ENABLED in the CDB root, the new value takes effect in all the PDBs in the CDB.

Therefore, if you change the value of AWR_PDB_AUTOFLUSH_ENABLED in the CDB root to true, the value of AWR_PDB_AUTOFLUSH_ENABLED is also changed to true in all of the PDBs, so that automatic AWR snapshots are enabled for all the PDBs.

You can also change the value of AWR_PDB_AUTOFLUSH_ENABLED in any of the individual PDBs in a CDB, and the value that is set for each individual PDB will be honored. This enables you to enable or disable automatic AWR snapshots for individual PDBs."


For more information, click here

3) I suggest you change the default settings in the PDB:

SQL> ALTER SESSION SET CONTAINER = IRONMANPDB1;

SQL> SELECT 
  DBID, SUBSTR(SNAP_INTERVAL,1,20) as SNAP_INTERVAL, 
  SUBSTR(RETENTION,1,20) as RETENTION, TOPNSQL, CON_ID 
  FROM awr_pdb_wr_control;


SQL> 
BEGIN
DBMS_WORKLOAD_REPOSITORY.MODIFY_SNAPSHOT_SETTINGS( 
                                                                                           retention => 14400, 
                                                                                           interval   => 30,
                                                                                           topnsql   => 50,
                                                                                           dbid    => 132885978);
END;
/

Retention => 7 days in minutes. The specified value must be in the range of MIN_RETENTION (1 day) to MAX_RETENTION (100 years).

Interval => Interval between each snapshot, in minutes. The specified value must be in the range MIN_INTERVAL (10 minutes) to MAX_INTERVAL (1 year).

topnsql => The number of Top SQL to flush for each SQL criteria (Elapsed Time, CPU Time, Parse Calls, Shareable Memory, Version Count). The setting will have a minimum value of 30 and a maximum value of 50,000.

dbid => Database identifier in AWR

For more information, click here

SQL> SELECT 
  DBID, SUBSTR(SNAP_INTERVAL,1,20) as SNAP_INTERVAL,  
          SUBSTR(RETENTION,1,20) as RETENTION, TOPNSQL, CON_ID 
  FROM awr_pdb_wr_control;


In my example, I'll change my interval to the minimum value, 10 minutes.

4) And now, I'm just check if the AWRs snapshots are being created.

SQL> SELECT 
                  con_id, instance_number, snap_id, 
                  SUBSTR(begin_interval_time,1,30) as begin_interval_time, 
  SUBSTR(end_interval_time,1,30) as end_interval_time 
  FROM cdb_hist_snapshot 
  ORDER BY 1,2,3;


5) And finally, to create the CDB AWR report or the PDB AWR report, we use the same script.

-- CDB
SQL> @?/rdbms/admin/awrrpt    


-- PDB
SQL> ALTER SESSION SET CONTAINER = IRONMANPDB1;
SQL> @?/rdbms/admin/awrrpt


That's it folks. As simple as that!

I hope this helps you!

Regards
Mario


quinta-feira, 31 de agosto de 2023

[ORACLE] How to configure disks for ASM using UDEV file?

Hello everyone

Do you know how to configure disks for Oracle ASM using UDEV file?

It's simple and I'll show to you!

But always remember:

  1. This step-by-step worked for me, but it may not work for you.
  2. It's a basic and limited environment. The real life will be different, for sure.
  3. This post is for study and testing as well, and has no concern for performance and security best practices.

So, let's get started!!!

1) I'll identify the disks using the root user.

    fdisk -l |grep /dev


    lsblk


2) I'll identify the "ID_SERIAL" for all disks.

    Example:
    udevadm info --query=all --name=/dev/sdb | egrep "ID_SERIAL"


3) I'll create the file "99-oracle-asmdevices.rules" in /etc/udev/rules.d.

    vim /etc/udev/rules.d/99-oracle-asmdevices.rules

    Insert a line for each disk:

    KERNEL=="sd*", SUBSYSTEM=="block",                     
    ENV{ID_SERIAL}=="VBOX_HARDDISK_VB843f4b1a-07e6004e", 
    SYMLINK+="data_0001",     OWNER="oracle", GROUP="oinstall", MODE="0660"

    Disks sdb. sdc. sdd = data_000?
    Disks sde, sdf, sdg  = fra_000?
    Disks sdh, sdi          = redo_000? 


4) And now, I need to reload the UDEV rules.

    udevadm control --reload-rules
    udevadm trigger --type=devices --action=change

    [root@csct-sp-ora01 u01]# ls -lrht /dev/data*
    [root@csct-sp-ora01 u01]# ls -lrht /dev/fra*
    [root@csct-sp-ora01 u01]# ls -lrht /dev/redo*


Ok, your disks are ready to be used in ASM!


Simple and easy, the UDEV file organizes the owners and accesses of your disks in a very clear way.

That's it folks!

I hope this post helps you!

Regards
Mario

terça-feira, 22 de agosto de 2023

[ORACLE] How can I create and check JSON schema in Oracle 23c? - Part 1

Hello everyone

I hope you're doing well!

As we know, JSON is very flexible and sometimes we need to validate the JSON structure.
Oracle 23c has an easy way to validate the JSON schema.

I'm going to access my database in docker:
docker exec -it Orcl23c /bin/bash 

I'll create a new table (I'll use the Visual Studio for better visuialization):

create table mylegos (
    id              number,
    json_data  json           validate '{
"type"      : "object",
"properties": { 
                                        "code"        : {
                                                          "type"           : "string",
  "minLength": 1,
  "maxLength": 10
     },
"collection": {
                          "type"           : "string",
  "minLength": 1,
  "maxLength": 15
     },   
"model"     : {
                          "type"           : "string",
  "minLength": 1,
  "maxLength": 20
     },
   "peaces"         : {
  "type"         : "number",
  "minimum": 0,
  "maximum": 4000
}
  },
"required" : ["code", "collection", "model", "peaces"]
}',
constraint t1_pk primary key (id)
);  


In my table, all JSON atributes are mandatory.

Now, I'll check the JSON schema:

set pages 120 lines 1000
set long 1000000
column table_name format a15
column column_name format a15
column constraint_name format a20
column json_schema format a60

select table_name, 
   column_name,
   constraint_name, 
   json_schema
from user_json_schema_columns;


And finally, I'll put some data into the table and simulated an error.

insert into mylegos (id, json_data) values 
   (1, json('
   {
"code":"42125",
"collection":"Technic",
"model":"Ferrari 488 GTE AF Corse #51",
"peaces": 1677
   }
'
)
);


Why did this happen?

I'm getting an error because the model has more than 20 characters. And it violated the "maxLength":20 constraint of the model attribute.

When I use the correct rule:

insert into mylegos (id, json_data) values 
   (1, json('
   {
 "code":"42125",
 "collection":"Technic",
 "model":"Ferrari 488 GTE AF51",
 "peaces": 1677
   }
'
)
);


select json_serialize(ml.json_data pretty) from mylegos ml;


And thats it! As simple as it sounds!

I hope this post helps you!!!

Regards
Mario

Postagem em destaque

[ORACLE] Batch change EDITIONABLE property.

Hello everyone. Hope you're doing well! Today, I have a simple case.   A test database had many database objects with the EDITIONABLE pr...